

Then shall the kingdom of heaven be likened unto ten virgins, which took their lamps, and went forth to meet the bridegroom.
And five of them were wise, and five were foolish.
They that were foolish took their lamps, and took no oil with them:
But the wise took oil in their vessels with their lamps. {Matthew 25:1-4}

Do I have oil in my lamp? Is my vessel clean, my wick trimmed, my reservoir filled? Am I ready to let my light shine now? Am I helping my children to fill their own lamps with precious spiritual oil?
“Be faithful, praying always, having your lamps trimmed and burning, and oil with you, that you may be ready at the coming of the Bridegroom” {Doctrine & Covenants 33:17}

To make your own clay oil lamps {that really work!} you’ll need oven bake clay and a candle wick.
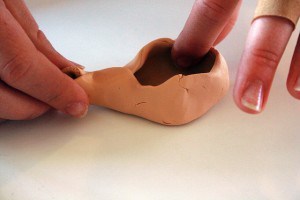
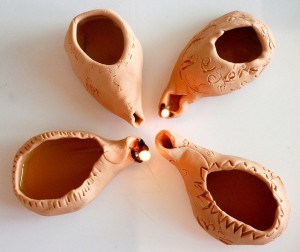
Form the clay into the shape of an oil lamp, with a small spout for the wick and a hole in the top to add oil.
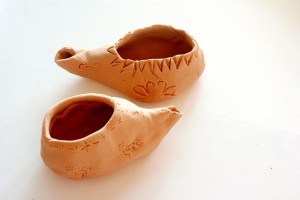
Decorate with designs. We just used toothpicks. Bake according to package directions.
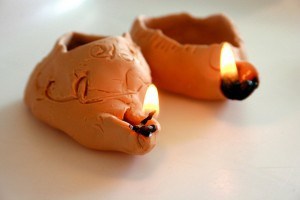
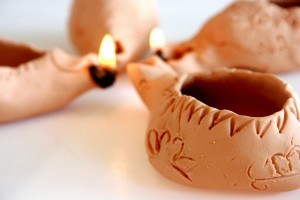
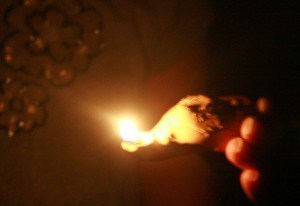
When cool add a small amount of olive oil to the lamps reservoir. Place a wick into the spout making sure most of it is in the oil with just a small part sticking out of the spout. Let the wick soak for a few minutes, then light.
As you are making your lamps discuss what will fill our own spiritual lamps with oil.
“In our lives the oil of preparedness is accumulated drop by drop in righteous living. Attendance at sacrament meetings adds oil to our lamps, drop by drop over the years. Fasting, family prayer, home teaching, control of bodily appetites, preaching the gospel, studying the scriptures—each act of dedication and obedience is a drop added to our store. Deeds of kindness, payment of offerings and tithes, chaste thoughts and actions, marriage in the covenant for eternity—these, too, contribute importantly to the oil with which we can at midnight refuel our exhausted lamps.”
(Spencer W. Kimball, Faith Precedes the Miracle, p. 256)
Here’s an illustrated telling of The Ten Virgins for younger children.
This coloring page is also a search to find the five who have extra oil.
This article is also helpful in explaining what the ten virgins, the Bridegroom, the vessels, the lamp, and the oil represent in the parable of the ten virgins.
I love this, I will definately be using this as an object lesson in primary.
this looks like a great activity! I will have to store it for when my kids are a little older.
This is one of our favorite Easter activities. Thank you, thank you, thank you for the video link, I had only been able to find the short version of it, and I really wanted to show my children the full version.
I just came across your blog and have been spending the last few days going over all your past posts and I am so happy to have found you! Thank you for your wonderful blog and for blessing the lives of so many!!! 🙂 I am a homeschooling mom in Utah too (we are in Tooele…) Blessings for a beautiful week ~
My parents live in Tooele!
Oh that’s wonderful! We love it here 🙂
This is exactly what I’ve been looking for and the best part is – it’s make it yourself! I’ve been looking for and wanting to buy a small oil lamp for object lessons or just as a display and this will work. Thanks for sharing your talents – and not hiding under a bushel! Right now I teach seminary (in our home) and I’m YW pres. so I appreciate the “leg” work you’ve done for me. TKT – CANADA
Just wanted to let you know I linked to this post on my LDS-YW blog. Thanks!
http://lds-yw.blogspot.com/2012/06/homemade-oil-lamps.html
Excellent. Thank you. Thank you.
Excellent. Thank you. Thank you.
Love this idea! How much clay would you recommend for each person to use to make their lamp? We are going to make these stakewide for Seminary and wanted to know how much clay to give to each Seminar class.
Thank you!
I think it was about 1 oz of clay per lamp {we had 2oz. packages and were able to make two lamps with each package}. How fun to do with your seminary classes!
Just found this and am so excited! I wrote a blog post awhile back about the oil in our lamps. I’ve been wanting to figure out how to make one or order them in cheaply. (They aren’t cheap,by the way.) ;o) Can I have permission to add a link to your post on my blog post? Here is the link for it so you know what it is you would be saying “yes” too. ;o)
http://www.allaboutbecoming.com/?s=oil+in+our+lamp
Thanks for a great activity!!
You are more than welcome to link! Your post was terrific, btw. 🙂
What brand of oven bake clay did you use? I want to make sure I don’t buy something that catches on fire 🙂
I used the Sculpey brand of oven bake clay. It won’t catch fire but the tip where the wick is will turn black.
I made a lamp from Sculpey and baked it 15 minutes, as directed. When I lit the wick, it burned nicely, wicking the oil. The clay tip turned black. I noticed that the flame had turned a bit green at the bottom where the clay was getting darker, which I understood as an indication that the polymers of the clay were actually slowly burning.
I made a second lamp and baked it twice as long. It acted the same way with a lit wick.
I did have my Sunday school class make the lamps, but advised them not to use oil and light them, as the burning plastic would be unhealthy.
Thank you so much for this post. I found it on Pinterest! For personal progress tonight at young womens we are reading a story book about the ten virgins and I am going to explain that working on Personal Progress is like adding oil to our laps. Then we will make the lamps and while they bake set our next personal Progress goal. Thanks for the great post and inspiration!
What shape do I cut the clay to make these lamps? I tried practicing w/salt dough and failed miserably? Do you have a template or dimensions to pass on?
help please
I don’t have a template to share. I just rolled a ball of dough, about the size of a walnut then flattened it into a teardrop shape. Then I brought up the sides of the drop pinching it to bring it together like the top photo of the tutorial.
Thanks for answering. I think my biggest problem was that I used salt dough and it was too limp. thanks again
Do you think air dry clay would work for this craft?
Oh thank you! I love this idea for a FHE, we will talk about how Faith helps light up our lives.
Goung to be doung this for next weeks mutual! Thank you for the great idea!
We made these this morning with sculpey clay I ordered from amazon. The 1 lb package was enough for five lamps. It could probably do six. Thanks for the great idea!
I absolutely LOVE this idea and will be doing this activity with my laurels soon but just out of curiosity, how long of a piece of wick did you use? Did you make it long enough for future use? I mean like, raveling a certain amount into to lamp so as to pull it out when the wick burned through? Thanks for the amazing ideas!
I can’t remember how long the wick was. It wasn’t rolled up in the oil. It was just long enough to use a few a times. Sorry I wasn’t more precise with that information!
We just had this activity tonight and it turned out great! We had a hard time at first molding the clay into lamps but it was entertaining to say the least 🙂 and I ended up giving them quite a bit of wick since I had so much of it. Just in case they wanted to actually use them at some point 😉 Anyhow, thanks again for the idea and sorry for the double post 🙁 it didn’t seem to have posted the first time lol
Wondering how long the piece of wick that you used was. I am planning on doing this with the laurels soon and just wanted to have an idea. I LOVE your ideas and appreciate you sharing your talents with us 🙂
I used this idea Sunday for my 14-15 year old Sunday School class. They were so excited and we had the best lesson on the parable of the 10 virgins. Thanks for this great idea!!!
Where did you get the wicks for the lamps?
I got mine at Michael’s. Any craft store that has candle-making supplies will have wicks.
Thanks for the great idea. I managed to make one and it turned out well. Am ready to try the wick part, and here might be a silly question. You mentioned olive oil. Can it be done with vegetable or canola oil which is cheaper?
That is a very good question! Unfortunately, I don’t know the answer. 🙁
Loved this! My daughter found this and we are hoping to use for a women’s conference!! Just one question! How much clay is needed per lamp… i need to make 10… !
It takes a walnut sized amount of clay for 1 oil lamp. Not sure how that translate into the different sized packages of clay…
I tried this a few years ago. After a few hours, the Olive oil would seep through the clay. After some reading, I found that clay needed to be baked and sealed. I could not find a satisfactory way to stop the oil from seeping. Any suggestions?
In my Bible study, several people have shofars. I have both shofars and drums. We blow our shofars,and bang on drums at the beginning of every Bible Study. It is one of the fun things that everyone looks forward to.