• Home
  • Create
    • Cookbook
      • Recipes
    • Crafts
    • Grateful Hearts Giving Hands
    • Holidays
      • Christmas
      • Easter
      • Independence Day
      • Thanksgiving
      • Valentine’s Day
    • Ingenious Ideas
    • Printables
    • Sewing
  • Family Life
    • Farming
    • Genealogy
  • Homeschool
    • Art
    • History
    • Homeschool Encouragement
    • Language Arts
    • Learning Styles
    • Library
    • Math
    • Science
    • Unit Studies
  • Motherhood
    • Home Making
      • Establish a House
    • Me
  • My Faith
    • Celebrate the Family Proclamation
      • Family Proclamation Articles
    • Family Home Evening Lessons
    • Flannel Board Stories
    • General Conference
    • Memorize the Family Proclamation
    • The Living Christ: An Easter Countdown
      • Living Christ Lessons
    • Young Women
  • Contact
  • About Me

Cranial Hiccups

Every once in a while and totally unintentionally my brain spews out a good idea.

You are here: Home / Create / Crafts / Easy Reversible Poncho

Easy Reversible Poncho

October 8, 2009 by Montserrat {Cranial Hiccups} Leave a Comment

Poncho Both Views

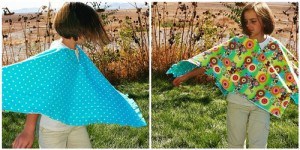
I love this time of year when there’s a nippiness to the air. It also heralds the poncho sewing season at our house. We’ve been sewing these for years not only for my girls but also as gifts. They are easy to sew, taking only 1 hour for the inexperienced sewer. All sizes are girls’ American.

Supplies needed:
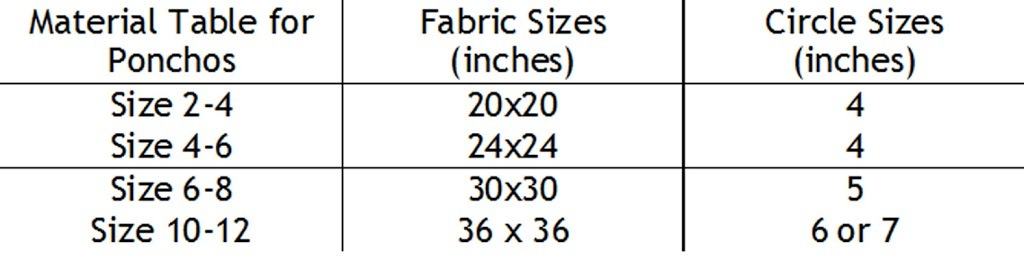
2 coordinating flannel or fleece fabric pieces (see chart for size measurements)
1 circle to trace (see chart to see what size circle you need)
Pencil
Scissors
Ruler
Yard Stick
Pins
Thread
Sewing Machine

Poncho 03

Step 1: Mark the very center of one square of fabric on the wrong side. To do this, fold one square of fabric in half with right sides together. Fold in half again the other way to make a square. Mark the point where both folded sides meet. (see photo above)

Poncho 04
Poncho 05

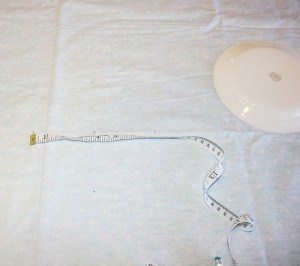
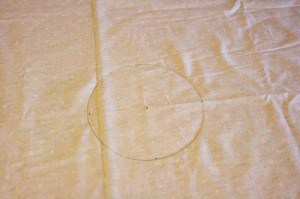
Step 2: Open fabric up. Place the circle exactly in the middle and trace around it. To help with placement I measure out from the center mark half the width of the circle. In the top picture I am measuring for a 7 inch circle, so I place my measuring tape so the center mark is exactly on the 3.5 inch and mark at the beginning of the ruler and at the 7 inch mark. I do the same going vertically so there are four marks. Place the circle on top lining up the edge of the circle with the marks. Trace around it.

Poncho 06

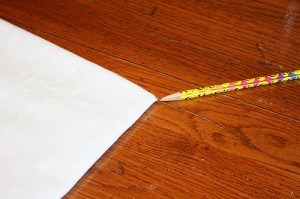
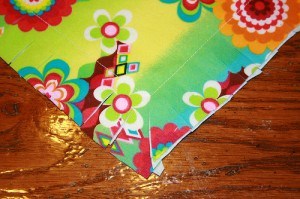
Step 3: Using a yard stick line up the center mark with one of the corners on the fabric. Draw a 2-3 inch line starting at the edge of the circle and going towards the corner. (see photo above)

Poncho 07

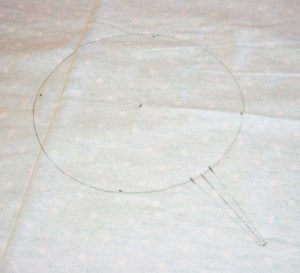
Step 4: Measure 1/4 inch from each side of the line on the circle. Draw a line from this mark down to the end of the line. You will stitch on the line around the circle and then on these lines you just drew. The 2-3 inch straight line you drew in step 3 will be your cutting line after you sew. (see photo above)

Poncho 02

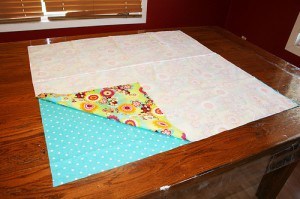
Step 5 : Lay other square of fabric on table right side up. Place marked fabric on top wrong side up so that the right sides of the fabric squares are together. (see photo above)

Poncho 08

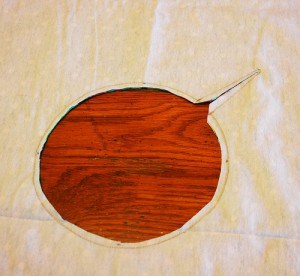
Step 6: Pin fabric together just inside the circle. Sew around the circle right on the pencil line and on the straight lines you drew in step 4. Cut out the middle of the circle 1/4 inch away from the stitching line. Carefully cut on the straight line in between the straight stitches. Clip corners. (see photo above)

Poncho 09

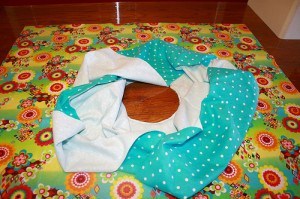
Step 7: Gather up top fabric and push through the center turning the fabric so right sides are out.

Poncho 10

Step 8: Press the stitched seams making sure to push the corners of the neckline out to make them crisp. Topstitch 1/8 away from the edge on the neckline.

Poncho 12

Step 9: Sew 2 inches away from the bottom edges of the poncho all the way around. Clip up to the stitch line to create a fringe. (see photo above) You’re done!!

Poncho 14

Optional sewing:
On the neckline you can either sew ribbon to both corners to tie or sew a button to one corner and a loop to the other.

Walmart has a huge selection of flannel fabric right now. Only $2.44 a yard. This poncho cost $5 to make!

Cocoa Signature with Candy 2
© 2007-2009 Chocolate on my Cranium, LLC all rights reserved

© 2007-2013 Chocolate on my Cranium, LLC all rights reserved

Share this:

  • Click to email a link to a friend (Opens in new window) Email
  • Click to print (Opens in new window) Print
  • Click to share on Facebook (Opens in new window) Facebook
  • Click to share on X (Opens in new window) X
  • Click to share on Pinterest (Opens in new window) Pinterest
  • More
  • Click to share on LinkedIn (Opens in new window) LinkedIn
  • Click to share on Reddit (Opens in new window) Reddit
  • Click to share on Tumblr (Opens in new window) Tumblr
  • Click to share on Pocket (Opens in new window) Pocket

Related

Filed Under: Crafts, Ingenious Ideas, Sewing Tagged With: Autumn, poncho, Tutorials

Leave a ReplyCancel reply

This site uses Akismet to reduce spam. Learn how your comment data is processed.

Hello, I'm Montserrat. I'm a farmer's wife, mother of eleven, homeschooler, chocoholic, music lover, and like to play a good game of Scrabble. You can read more about me here. . .

You'll find a little bit of everything on this blog. It's my place to share all the ideas, activities, crafts, and resources that I have gathered and tried over a number of years. Feel free to browse around using the menu up top or doing a search in the box below.

Enter your email address to subscribe to this blog and receive notifications of new posts by email.

Archives

October 2009
S M T W T F S
 123
45678910
11121314151617
18192021222324
25262728293031
« Sep   Nov »

Return to top of page

COPYRIGHT © 2025 Montserrat Wadsworth at Cranial Hiccups • Lifestyle Pro Theme on Genesis Framework

[ Placeholder content for popup link ] WordPress Download Manager - Best Download Management Plugin