• Home
  • Create
    • Cookbook
      • Recipes
    • Crafts
    • Grateful Hearts Giving Hands
    • Holidays
      • Christmas
      • Easter
      • Independence Day
      • Thanksgiving
      • Valentine’s Day
    • Ingenious Ideas
    • Printables
    • Sewing
  • Family Life
    • Farming
    • Genealogy
  • Homeschool
    • Art
    • History
    • Homeschool Encouragement
    • Language Arts
    • Learning Styles
    • Library
    • Math
    • Science
    • Unit Studies
  • Motherhood
    • Home Making
      • Establish a House
    • Me
  • My Faith
    • Celebrate the Family Proclamation
      • Family Proclamation Articles
    • Family Home Evening Lessons
    • Flannel Board Stories
    • General Conference
    • Memorize the Family Proclamation
    • The Living Christ: An Easter Countdown
      • Living Christ Lessons
    • Young Women
  • Contact
  • About Me

Cranial Hiccups

Every once in a while and totally unintentionally my brain spews out a good idea.

You are here: Home / Create / Sewing / Reverse Applique on a T-shirt

Reverse Applique on a T-shirt

April 30, 2010 by Montserrat {Cranial Hiccups} 10 Comments

Reverse applique is a fun project to do on t-shirts. Knit fabric doesn’t fray so you don’t have to worry about finishing the edges.

Supplies Needed:
*old t-shirt
*fabric scraps
*freezer paper
*sharp scissors
*contrasting thread (optional)

Gray shirt 01

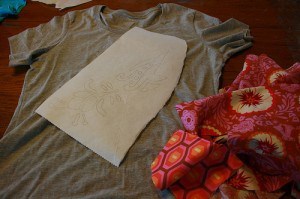
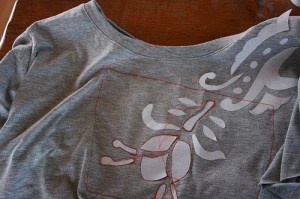
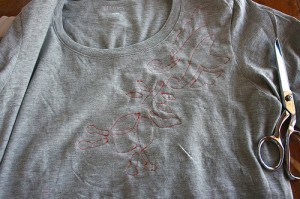
Step 1: Draw your pattern on a piece of freezer paper. I just drew my design free hand taking a cue from the fabric I was using.

Gray shirt 02

Step 2: Cut out the freezer paper pieces and iron the shiny side down to your t-shirt. If you need to, baste your freezer pieces down as well, just once down the middle of the piece.

Gray shirt 03

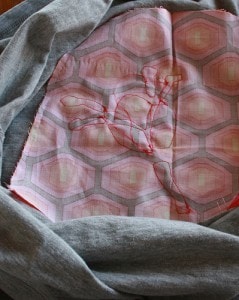
Step 3: On the inside of the shirt place a piece of fabric so the right side of the fabric is against the wrong side of the t-shirt. You want to make sure your fabric will cover the parts of the pattern thoroughly. Baste this piece in place with your sewing machine.

Gray shirt 04

Gray shirt 05

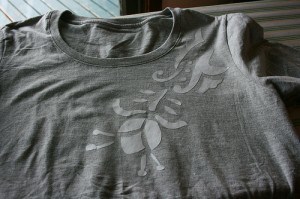
Step 4: On the right side of your t-shirt sew around each freezer paper piece. It’s okay if you accidentally sew on the paper. It will rip off later and no one will be the wiser. ☺

Gray shirt 06

Step 5: After you’ve sewn around the pieces you want in the first fabric turn the shirt inside out and take a peek. You want to make sure that you didn’t sew off the fabric. If you missed the fabric you’ll have to take out the stitching, readjust your fabric on the back and try again.

Gray shirt 07

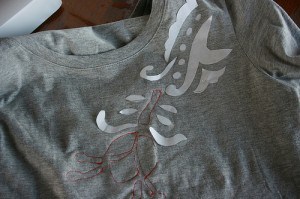
Peel of the freezer paper pieces you’ve sewn around.

Gray shirt 08

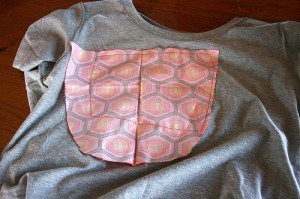
Step 6: Trim the fabric on the back about 1/8 inch away from the outside of the stitching.

Gray shirt 10
Gray shirt 09

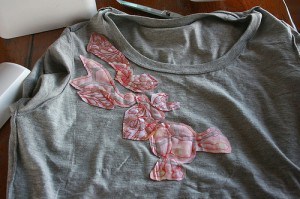
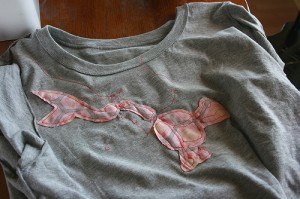
Step 7: Repeat steps 3-6 using different fabrics for different parts of your design until you have sewn every detail.

Gray shirt 11

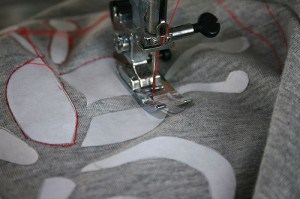
Step 8: On the front of your t-shirt carefully clip away the t-shirt fabric 1/8 inch inside the stitching, revealing the fabric underneath. Magic! It’s like doing one of those scratch boards and you’re not quite sure what colors will peek through when you start scratching out a drawing.

Gray Reverse Applique shirt

Cocoa Signature with Candy 2 © 2007-2009 Chocolate on my Cranium, LLC all rights reserved

© 2007-2013 Chocolate on my Cranium, LLC all rights reserved

Share this:

  • Click to email a link to a friend (Opens in new window) Email
  • Click to print (Opens in new window) Print
  • Click to share on Facebook (Opens in new window) Facebook
  • Click to share on X (Opens in new window) X
  • Click to share on Pinterest (Opens in new window) Pinterest
  • More
  • Click to share on LinkedIn (Opens in new window) LinkedIn
  • Click to share on Reddit (Opens in new window) Reddit
  • Click to share on Tumblr (Opens in new window) Tumblr
  • Click to share on Pocket (Opens in new window) Pocket

Related

Filed Under: Sewing Tagged With: Tutorials

Comments

  1. Courtney says

    April 30, 2010 at 7:53 am

    Love it! Thanks for sharing. Can you show how you did the green one too, with the ruffle down the middle?

    Reply
  2. Jocelyn Christensen says

    April 30, 2010 at 9:19 am

    I like it!

    Reply
  3. water works says

    April 30, 2010 at 10:39 am

    That’s exactly how I imagined doing it. Love the AMH fabrics! Did you make the little dress Hershey’s wearing with her dandi crown? Loved it!

    Reply
  4. Chocolate on my Cranium says

    April 30, 2010 at 10:53 am

    I LOVE Anna Maria Horner’s fabric! And yes, I made three peasant style dresses for Hershey using her fabric line. The bright colors are perfect for spring and summer. I can’t seem to get enough of AMH’s fabric. I seem to spend all of my splurge money on it. 😀

    Reply
  5. Poconoangel says

    April 30, 2010 at 2:08 pm

    Love it! I have to try this!

    Reply
  6. This Girl loves to Talk says

    April 30, 2010 at 6:31 pm

    i do it by just penciling a shape on (i usually do numbers for birthday shirts)

    Iron on webbing (vlisoflex its called in australia) on the underside of shirt.

    Then I hand sew around the shape. The use small scissors to cut out.

    heres my tutorial (not as good as yours 🙂

    http://comber-family.blogspot.com/2009/07/reverse-applique-for-birthday.html

    Reply
  7. Charlotte says

    May 1, 2010 at 4:47 pm

    I can’t believe how easy that looks. I’m definitely need to try that!

    Reply
  8. Amy says

    May 1, 2010 at 5:13 pm

    So cute and not too hard. I want to go buy a cheap shirt to do this to!

    Reply
  9. Megan says

    June 22, 2010 at 2:16 pm

    I totally made this type of shirt after your post! Thanks for the inspiration! If I ever get to blogging about it (on http://www.newlywife.com), I will let you know!

    Reply
  10. Aleena says

    January 19, 2011 at 2:32 am

    Can you show how you did the green one too, with the ruffle down the middle?

    Funny Shirts

    Reply

Leave a ReplyCancel reply

This site uses Akismet to reduce spam. Learn how your comment data is processed.

Hello, I'm Montserrat. I'm a farmer's wife, mother of eleven, homeschooler, chocoholic, music lover, and like to play a good game of Scrabble. You can read more about me here. . .

You'll find a little bit of everything on this blog. It's my place to share all the ideas, activities, crafts, and resources that I have gathered and tried over a number of years. Feel free to browse around using the menu up top or doing a search in the box below.

Enter your email address to subscribe to this blog and receive notifications of new posts by email.

Archives

April 2010
S M T W T F S
 123
45678910
11121314151617
18192021222324
252627282930  
« Mar   May »

Return to top of page

COPYRIGHT © 2025 Montserrat Wadsworth at Cranial Hiccups • Lifestyle Pro Theme on Genesis Framework

[ Placeholder content for popup link ] WordPress Download Manager - Best Download Management Plugin