
Really, making my images interactive is so easy I shouldn’t label it a tutorial, but many of you have asked how I do it.
I’m stating right up front, that I am not being paid or compensated for saying any of this. I’ve just used Thinglink and enjoyed having it as part of my blog.
The basic service is free! With Thinglink, you add “tags” to your photos. These tags can be used to explain parts of the photo, add links to websites, or you can even add audio or video clips. Your photos can be shared on facebook, tumblr, or blogs. There is also a two week free trial period so you can decide for yourself if it is something you really want to integrate into your blog.
Go sign up because the rest of this post assumes you have created a Thinglink account. 🙂
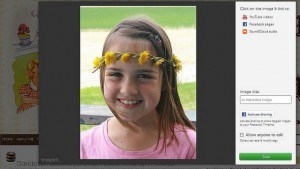
There are two ways to tag images. The first is to upload or import an image into your Thinglink account. You can import from Flickr or upload directly from you computer. There is a limit however to how many photos you can upload – 50 for the basic plan, 500 for the Plus account. When you have imported or uploaded an image you will be taken to a screen that looks like this.
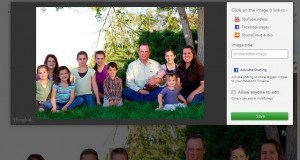
Here’s where you will do all your tagging. Hover over the image below to see explanations of how to tag.
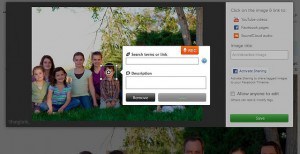
When you are done tagging your image it will look like this with tag boxes all over {see photo below}. You can click and drag the tag boxes wherever you want, for instance I moved mine so the circles aren’t covering any faces.
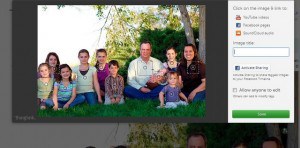
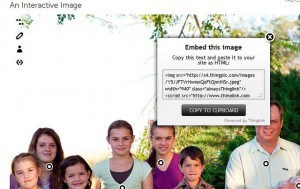
Once you are done click save. Scroll over the top left of your image to see the symbols and click on the bottom one to get the embed code {see photo below}.

Click on the copy to clipboard button. In your blog’s post writer window click on “Edit Html” tab and paste the code where you want your image to be in your post.
The second way to tag images, and my personal favorite, is to add the Thinglink plug-in to your blog. This plugin allows you to tag any image on your blog as long as you are logged in to your Thinglink account. Thinglink has great instructions for adding the plugin so I won’t go into that here.
While looking at your blog you can move your mouse over any image and you will see the following symbols pop up at the top left of the image {see image below}.

Clicking on the pencil icon will open the image just as if you were in Thinglink and you can tag away. I like this option the best because it is easier and these images are NOT counted toward the upload limit.
I have the Plus account for $5 a month so I can see the statistics of the interactive images. For instance here is part of the statistics for my May calendar. Hover over each part to see the explanation of what the statistics say.

If you decide to try Thinglink on your blog, let me know. I’d love to come and visit!
 © 2007-2012 Chocolate on my Cranium, LLC all rights reserved
That’s pretty neat- and looks fairly easy. I’d do it if I was actually willing to commit to having certain posts up by certain days. Still not sure how you do it! ( : Looking forward to your posts though.
I wondered how you did that! Thanks for sharing! 🙂
A wonderful tutorial… For those curious about all the incredible tags you can add to an interactive image, check this slideshare of ThingLink Rich Media Tags. Pls share. ow.ly/aAypF
Awesome! I am pinning it so that when I come back from vacation I can try it out! I love the simple explanation. Thank you so much for the tute!