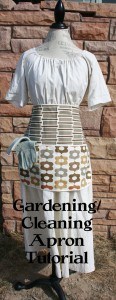
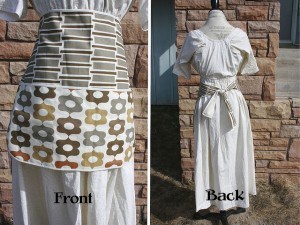
Sometimes we just need an apron that has pockets. This apron has three large pockets perfect for holding cleaning or gardening supplies. It is made with sturdy material like denim, canvas, or home decor weight fabric.
Pin It
Supplies needed:
1/2 yd 54/55″ wide fabric OR 3/4 yd 44/45″ wide fabric
1/2 yd coordinating fabric (either width)
2 packages 1/4″ OR 1/2″ wide double fold bias tape
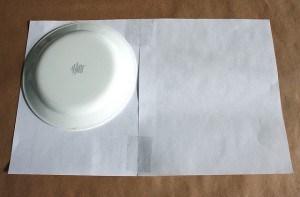
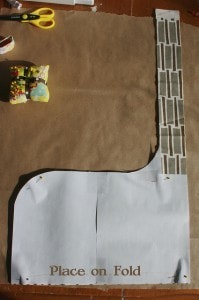
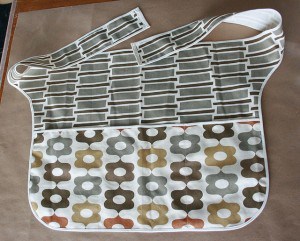
Step 1: Create pattern pieces. First trim three 8.5 x 11 inch pieces of paper to 8.5 x 10 inches. Tape two of the pieces of paper together along a ten inch side overlapping the pieces 1/2 inch to create one large piece of paper 16 x 10 inches. At one corner of this piece place a small bowl or plate and trace the curve. {see photo above} Do the same with the smaller piece of paper. Cut out along the curve line.
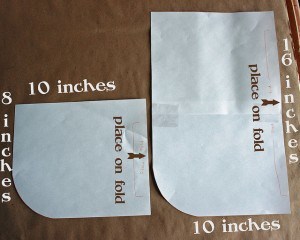
You should have two pattern pieces like those pictured above. The curve is the bottom of the pieces. The opposite edge should be placed on the fold when cutting the fabric. The large piece is the apron pattern, the small piece the pocket pattern.
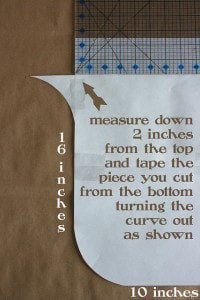
Measure down two inches from the top of the large pattern piece and tape the piece you cut from the bottom turning the curve out as shown in the photo above.
Step 2: Cut out the fabric. Place the long uncut sides on the fold. When cutting out the large apron piece extend the two inch wide strip to the selvage as shown in the photo. This strip will become the ties. If you are using a 44/45″ wide fabric you will need to cut more two inch strips to sew onto the ties. If you are using a 55/60″ fabric these ties should be long enough without additional strips being added.
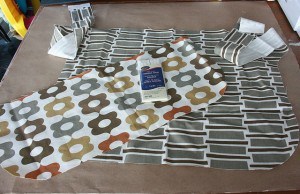
You should have one large apron piece with ties and one pocket piece.
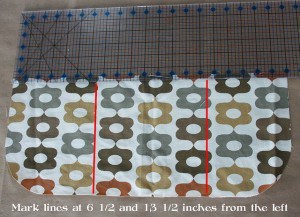
Step 3: On the pocket piece mark lines at 6 1/2 and 13 1/2 inches from the left edge.
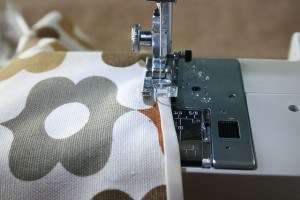
Step 4: Cut a 20 inch piece of bias tape. Sew on the top of the pocket piece encasing the raw edge. This is a good explanation of sewing on bias tape if you have never done it before. I used the “cheating” way for this apron.

Step 5: Lay the apron piece on the table right side up. Place the pocket piece on top, right side up, matching the bottom, curves and sides. Pin and sew along the edges and down the marked lined to create the pockets.
Step 6: Sew bias tape around the outside of the apron and ties encasing all raw edges as shown in the photo above.
You are done!

The winners of last week’s Reversible Ruffle Apron are Christina W. and Diana D. I have already sent you e-mails so please check your inboxes!
 © 2007-2011 Chocolate on my Cranium, LLC all rights reserved
I love all of your aprons!! I some how missed that you were giving them away. But I also love that dress! Since the first apron post I’ve been wondering how I could get my hands on one like it.
Love you blog!
The dress is the Ladies 1780’s Portrait Dress from Sense & Sensibility patterns. They have a wonderful selection of historical patterns. These were dresses we made for Easter last year for all the girls.
Thanks!
I love this design. Makes me want to garden more (maybe even clean a bit more). I’ll have to see if I have any fabric on hand that would work for this, since I’m sewing through stash this year. Thanks for sharing.
Jennifer N.
Another great apron!
yay!! i’m really enjoying your apron tutorials. thank you for posting them!! i think i’ll make this one for my sister. i made the reversible apron and i use it all the time.
This is a darling apron! I love the color combination of the materials! You are too talented for your own good. 😉
Malissa Z.
LOVE!! Amazing talent!
tigertfam@gmail.com
That is such a cute gardening apron. I just wish it was warm enough in WA to plant my garden.
Yes, love the apron, but it’s the dress I’m drooling over. Love, love, love it….and I wonder if it can be made into a shirt as well, one of the longish tunic type….maybe fitted, maybe not….
OOOooooo, I love this so much!!!
I am loving your aprons. I need to find me some time to make an apron. Do you have kid ones up next? I have an almost two year old who loves to help me bake. I thought it would be fun to make him one.
definately need an apron thats going to inspire cleaning! ;)If I make one will it come with that magic ability..
You inspire me to dig out my mom’s old sewing machine and figure out how to use it:)
this is AMAZING!
LOVE this one. My oldest actually made one very similar for his Grandma for Christmas this year.
Side note, how do you add the pin it button with actual text already in the pin box? I might add that and don’t have a clue…you really are my “go to girl” for tech questions. 🙂
I have never thought about buying, let alone making, a gardening apron… but DUH. Now I am going to have to make one before gardening season gets here! 😀 I even have some outdoor furniture fabric I used to redo an outdoor swing, so I think I’ll use that. How fun!
Great tutorial! Can’t wait to make one (or a few) myself. 🙂
I love the weekly apron post. Our RS Birthday Party later this week is all apron decor. 🙂
Great idea for this one! Easy to do with the binding and the pockets are great. I, too, would use a sturdy fabric for it.
@Emily – Cocoa has a good kids’ apron in her tutorials. Also, Sew Liberated has one I used for my girls because it has an elastic neck and velcro waist band – no ties for little hands.
Thanks so much! I will check them out this weekend! No plans so far. Whoo hoo!
This one is my favorite so far, though usually I use bibbed aprons.
I’m a full apron girl too! They’ll be coming soon. I plan on doing a walk through of time – some 19th century aprons and down through the decades of the 20th century. Won’t that be fun?
I’m going to have to a couple like this but might make them more boyish with duck cloth – thanks for sharing!
I having been thinking I really need to have a few more aprons to rotate through. (I only have 1).
Love this one! So cute! You are so talented in all you do!
I love the curve made with a plate. I love the material. I love the pockets. Great apron. ~Kathy