{Sorry this is up so late today! It takes longer to edit and upload pictures for the tutorial than it does to sew two of these aprons!}
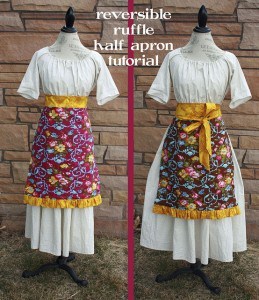
I love reversible aprons! Half aprons are definitely easier to make as reversible aprons. This one has a ruffle detail on the bottom to add a feminine touch.
Pin It
Supplies needed (will make two reversible half aprons):
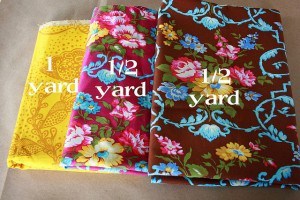
three coordinating fabrics
- 1 yard for the waistband and ruffle
- 1/2 yard each for the front and back
All seams are 1/4 inch unless otherwise noted.
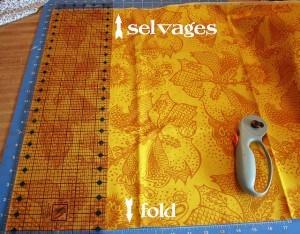
Step 1: From the waistband fabric cut the yard (from fold to selvage) into the following strips: 1 – 6 inch wide strip, 6 – 5 inch wide strips.
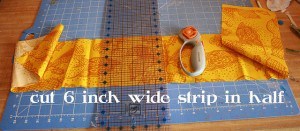
Step 2: Cut the six inch wide piece in half at the fold to create two pieces about 6×22 inches. These are the waistband pieces. You will need one for each apron.
Step 3: Cut the remaining half yard pieces in half along the fold line so you end up with four pieces each approximately 18×22 inches.
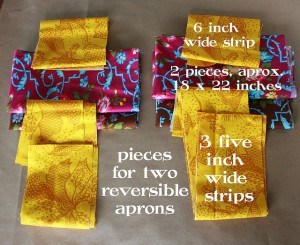
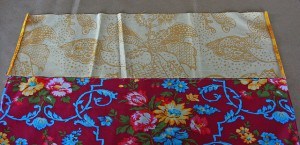
You should now have all the pieces to make two aprons as shown in the picture above. One apron will be shown in the tutorial. For one apron you need three 5 inch wide strips, one 6 inch wide strip, and two 18×22 inch rectangles of fabric.
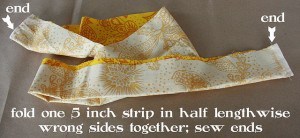
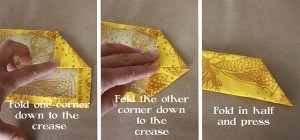
Step 4: We will make the ruffle first. Take one 5 inch long piece. Fold it in half lengthwise, wrong sides together, and sew just the ends.
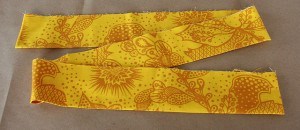
Turn right side out, match up the long edges and press.
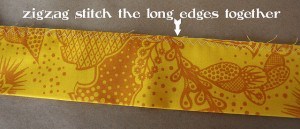
Step 5: We are going to gather this long edge. The way I do it is zigzagging with the widest stitch along the edge. Gently pull the ends of the thread to gather the fabric.
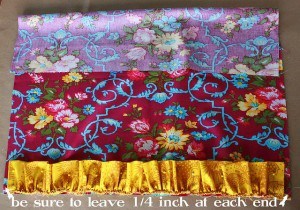
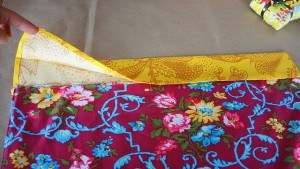
Step 6: Place one main fabric piece on the table, right side facing up, with the 22 inch edges at top and bottom. Place the ruffle on top so the gathered edge is matched along the bottom edge and the rest of the ruffle is on top of the fabric. Make sure to pin fabric 1/4 inch (or slightly more) away from the side edges. {see photo above}
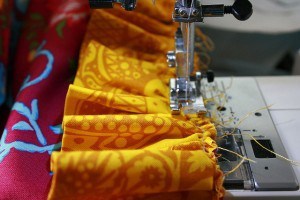
Step 7: Sew the ruffle to the apron piece.
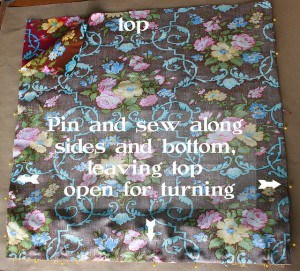
Step 8: Place apron piece with ruffle on the table again, right side up. Place the other apron piece on top wrong sides together. Pin and sew along the sides and bottom only, leaving the top open for turning.
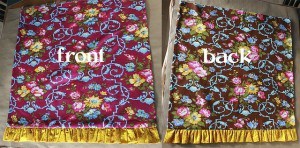
Step 9: Turn right side out and press. Looking cute on both sides!

Step 10 (optional): Top stitch 1/8 inch from the edge along the sides and 1/8 from the op ruffle edge. {see photo above}

Step 11: Waistband time. Take the six inch wide piece and lay it at the top of the apron piece. Measure how much you need to press in the sides so it is even with the apron piece.
Press.
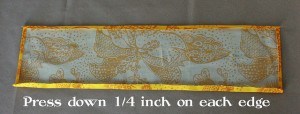
Then press down 1/4 inch along each long edge.
Fold in half lengthwise; press. Make sure edges meet when pressing!
Step 12: Place bottom pressed edge of waistband on either side of the apron pieces so you create a “sandwich” with the waistband as the bread. Make sure apron piece is tucked in to the waistband at least 1/4 inch. Pin and sew along this edge only. DO NOT sew along the sides.
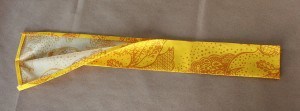
Step 13: To make the ties, take the two remaining 5 inch wide strips and press down the fabric 1/4 inch along each edge like you did for the waistband. If you want a pointy end on your tie follow the photo above. You only need to do this on one edge of each tie as the straight edge will be tucked into the waistband.
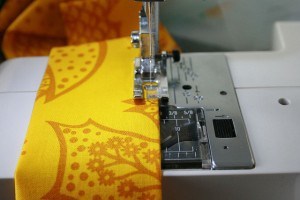
Step 14: Sew together the long sides 1/8 inch from the edge.
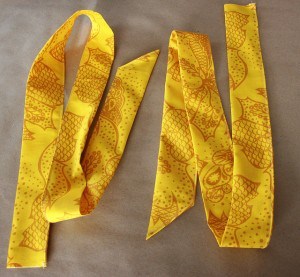
Two ties ready to go!
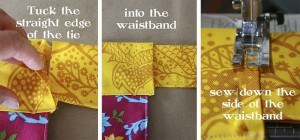
Step 15: Tuck the straight edge of one tie about 1/4 inch into the waistband. Pin and sew down the side edge of the waistband. Repeat with the other tie.
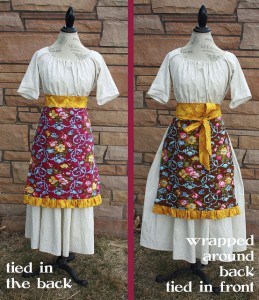
All done! The ties are long enough that those of us with a wider berth {ahem, ME} have plenty to tie in the back, while those who are skinnier have plenty to wrap it around and tie in the front.

The winner of the Simple Reversible Half Apron from last week as chosen by Rafflecopter was Jaime of Welcome to the Madness!
Enter for your chance to win this week’s apron. Two people will win!
 © 2007-2011 Chocolate on my Cranium, LLC all rights reserved
Thanks for taking your time to make this tutorial! My mom never wore aprons, so they are new to me. You wrote in one post awhile back that it is more fun to do house work while wearing a fun apron, and it’s true! Thanks again!
Very cute! I agree that it often takes longer to fix up the pictures and write the post than it takes to actually DO the thing you’re blogging about! That’s why my pictures are just blah usually. ( :
How beautiful! And simple and elegant, all rolled into one! Sweet!
LOVE this!!
Love those Aprons. Love all your tutorials. Hope I win.
YAY! I am super excited to have won that apron from last week. (you KNOW I love aprons!)
I just picked up fabric today to make last weeks apron, but now I am totally making this one. So super cute.
Thank you so much for sharing your creativity. (and aprons!)
I would love to find a really good pattern for a full body one that pins up for gathering food and fruit…I am hoping for one of those soon. 🙂
You make this look so easy! I need to dust off my sewing machine, these would make a cute Mother’s Day gift.
Love it. I am really loving half aprons lately.
love them! I do wear aprons occasionally (usually if I am wearing something nice and cooking something messy) but I really want to get into wearing them much more often!
Cute! Is the dummy that the apron is “posing” on yours? I wish I were a good enough sewer to warrant having a dummy.
Hi Shauna,
Isn’t that mannequin great? It was a birthday present to my daughter from Grandma. She LOVES dressing it up. She lets me borrow it for these tutorials.
Not only do I love the style, but I love the colors on those fabrics!
Hey Cocoa. Your aprons turned out so pretty. And that’s one of the best tutorials I’ve seen! Love how clear and concise it is.
I have a question. What kind of light do you use to get such awesome pictures. They’re so bright and clear. I know how important lighting is, which mine is not in my house and I desperately need a new camera. I’d love to hear your tips.
Have a great Wednesday. Hugs…Tracy @ Cotton Pickin Cute
Hi Tracy,
I use as much natural light as possible. I have TWO windows where the lighting is the best. One lets in good light in the morning, the other in the afternoon. These pictures were all taken in the afternoon, including the mannequin pictures. It was cloudy outside so no harsh shadows were made.
Sew cute!
Love the aprons and Love your site. So many helpful ideas and recipes. 🙂
-Trisha
tigertfam@gmail.com
I LOVE, LOVE this apron! Makes we want to run off to the fabric store right now! I’m having the feeling that I’d better wait a bit to see what other FUN aprons you post. (I’m wanting one with pockets, though I could probably figure that out myself). I can see myself making this one and finding that I love the next one even more … though I’m sure it wouldn’t be a problem to have more than one. 🙂 A question, How well would this work for someone who is already a little wider, and then pregnant? Just thinkin’ ahead…..
The next one will definitely have pockets!
So cute! I’m an apron girl all the way.
Love it, darling.
I LOVE, LOVE this apron! Makes me want to run to the fabric store right now!
I ♥ aprons, and this would be a great addition to my collection.
Thanks for sharing!
This apron is really cute!
Do you have a pattern for a gathering apron? — One to wear while gathering the garden bounty?
Awesome apron! Very cute!
Love this apron!
Beautiful! What a simple pattern, I think my daughters and I will have to make these for Christmas gifts, but in the meantime – I would LOVE to win one!
So cute! And looks easy enough to actually attempt to make!
Do you have a tutorial on how to make the dress that your maniquin is wearing? We have a homeschool Jane Austin ball in march and I want to make one for my mom, me, and two of my sisters!
The dress was made using the 1780s Portrait Dress Pattern from Sensibility.com. For Easter one year we made these dresses for all the girls. You can see them wearing the dresses in this post.
Oh, and there is a pattern to fit little girls on their website as well.